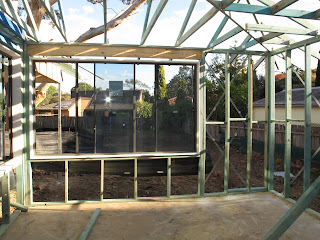
Since the last blog update they have installed the windows and also started on the main bedroom balcony. Our external colour choices closely matches the Riva display home at Kellyville, so the window and door frames will be in a Woodland Grey colour. If you're wondering why the frame is a green colour, it's because we received the white ant resistant frame as part of the 2011 Spoilt for Choice Promotion. We also received our invoice the other day for the stage 3 payment for the frame.
Front awning windows
Front entrance
Doors for the balcony, family room and dining room
Window in the powder room
Plumbing for the powder room vanity basin
Window in the study which we didn't expect to be so low, we checked the plans and this is correct. Would have been nice if this wasn't so low, but you don't realise these things until you physically see it.
Window in the butler's pantry
Window in the kitchen
Family room door frame, these will be bi-part sliding doors so the actually opening will be half what you see here.
Dining room door frame, these doors will be 5 panel bi-folds made of aluminium. We chose aluminium over wood as it would have cost an additional $3000 and the maintenance would be practically nil.
Rumpus room window looking into the back yard
Rumpus room window looking into the grand outdoor room
Rumpus room and the grand outdoor room
Main bedroom French door frame
En suite bathtub and window, not much of a view but atleast we're not looking into anyone's window.
Bedroom 5 awning windows overlooking the street
Bedroom 5 privacy window
Bedroom 4 privacy window
Bathroom tub and awning window which looks towards the backyard
Bedroom 2 privacy window
Bedroom 3 privacy window
Bedroom 3 awning window overlooking the back yard, I thought this window would get a decent view of the backyard but didn't realise the grand outdoor roof would be in the way.
Joist work
Steel beam between the kitchen and dining room
Steel beam looking from the dining room
Kitchen window from the outside
Butler's pantry window from the outside
Laundry door frame installed.


Hi guys, I've just come across your blog, it's great! lot's of pics and details! It looks like a beautiful street that you are building in too. The house is looking awesome! Like you said with the window being lower than expected, we have found the same thing with a few little things, it is not until you see it do you realize how it actually is, I wish we had a take 2 opportunity! I will have to pop back and read the rest of your blog later :-)
ReplyDeleteHi Mel, you would think the hours at looking at your own floor plan you would pick this up, but it doesn't help. We were told by a friend to take note of any windows in the plan with the letter "F" next to it. "F" means fixed so it can't be opened. I took note but just only today I tried to open the front facing window in bedroom 5 (we converted it from a leisure room to bedroom 5) to my surprise I couldn’t as it was fixed. DOH! It would have been nice to have some cross ventilation but oh well, live and learn.
DeleteOh bummer about the fixed window!! It's like our fridge it is completely on the wrong side, if we had have put it on the other side it would have saved so many of my now dilemmas that the you can see everything in the pantry from the dining room and our fridge opens the wrong way so it is going to be awkward to get anything out until we can buy a new fridge :-( but yep live and learn!! I now understand why people build a second time.
Delete